Tuesday, May 12, 2015

A goddess’ shared kombucha tea

So I havent blogged in a while and I apologize.  With work and getting married, this past year has been a whirlwind.  No matter how busy I get, cooking is always the way that I calm down and relax.  Cooking in the kitchen is definately my safe place.  If you follow me on instagram, (sarahandrews6), you'll see my weekly creations.  I promise to be better about blogging some of these creations starting this Summer.

For now, I really just want to talk to you about fermenting.  2015 has been a year of fermenting for me so far.  I've started an attempt to make sour dough bread and also have started making my own kombucha.  I have to say, the second has been much more successful.  So today, I'll talk about that.

What is kombuhca? Wiki says, Kombucha is a lightly effervescent fermented drink of sweetened black or green tea that is produced by fermenting tea using bacteria or yeast, also reffered to as a scoby.  Kombucha has been used for decades around the world as a overall health and wellness drink.  I personally have spent up to $100 a month at Whole Foods buying pre-made kombucha, so I was so excited when a good friend and I made a commitment to learn to make our own in 2015.

It started in March.  I was passed down a scoby (or mother) for kombucha by one of my dear friends, Elena.  Elena had recieved her original scoby from one of her dear friends as well.  Each of these ladies are goddesses- as all women should be!  They love making organic, natural products that are good for overall health and well-being.  I am lucky enough to know Elena, and to benefit from their love for health.  

I'm sharing this goddess recipe for kombuhca tea with you and I welcome your comments and feedback.  I have been using this recipe for 4 batches now and it has worked great.  The tea is amazing and I love making it myself.  If you're local and want a scoby starter, let me know!  I have plenty!! They multiple quickly.


A goddess’ kombucha tea

This is a basic recipe for making 2 quarts of Kombucha, passed down from the goddess tribe.

What you’ll need:
·         1 Scoby (or Mother, as it is sometimes called)
·         4 tea bags- organic black or oolong tea is best
·         1 cup Kombucha starter tea from last batch
·         ½ cup organic sugar
·         Filtered water

Preparation:  Place the 4 tea bags and the sugar in about 2 cups of hot (near boling) water.  Stir the sugar until it dissolves, and let the tea brew until it has cooled.  Put the cooled tea and sugar mixture, 1 cup of Komucha, and the Scoby in a wide mouth 2 quart jar and then fill the jar to about 1 inch from the top.  Stir the mixture with a wooden spoon (never expose the Scoby or the finished culture to metal).  The wider mouth jar you use, the faster the fermentation process.

Storage:  Cover the jar with a cloth napkin or coffee filter and secure it with an elastic band.  (the cloth is to keep bugs out while letting air in, cheesecloth will not work)  Place the jar away from direct sunlight and away from different cultures you might have fermenting (which can cause cross-contamination and weaken the scoby) in a place where it wont have to be disturbed often and allow it to ferment to your taste preference.  (to taste, dip a drinking straw into the Kombucha into your mouth) 

Fermentation:  Room temperature and the size of the opening on the container you are fermenting in will influence how long it takes to brew.  In the winter, when the house is around 68 degrees, it can take up to two weeks for the Kombucha to finish.  In the summer, when the room temperature is higher, in the high 70s, it may only take a week to complete fermentation. 

After you’ve completed fermentation…its time to make your drinking kombucha!

What you’ll need:
·         2 quarts kombucha
·         1 ½ to 2 cups organic fruit juice
·         Flip-top style bottles (I bought mine off Amazon)

Preparation:  Strain scoby from fermented kombucha tea, reserve 1 cup of the kombucha for the starter in your next batch.  Mix the remaining kombucha with your fruit juice of choice.  Pour into your flip-top brewing bottles.  Fill only to the part of the bottle where the neck starts.  This allows your kombucha to gain carbonation.  Close bottles and allow to culture for 72 hours at room temperature.  After 72 hrs, refrigerate and enjoy!! 


Helpful tips in no particular order:  Never touch metal to the scoby! The wider mouth jar, the faster the fermentation.  If you chilled kombucha does not seem to have a lot of fizz, allow to culture longer after bottling.  Always use caffeinated tea to make you kombucha tea- this helps aid fermentation.  Change up the juice!  I’ve found tart cherry and apple to be my favorites!

Thursday, January 23, 2014

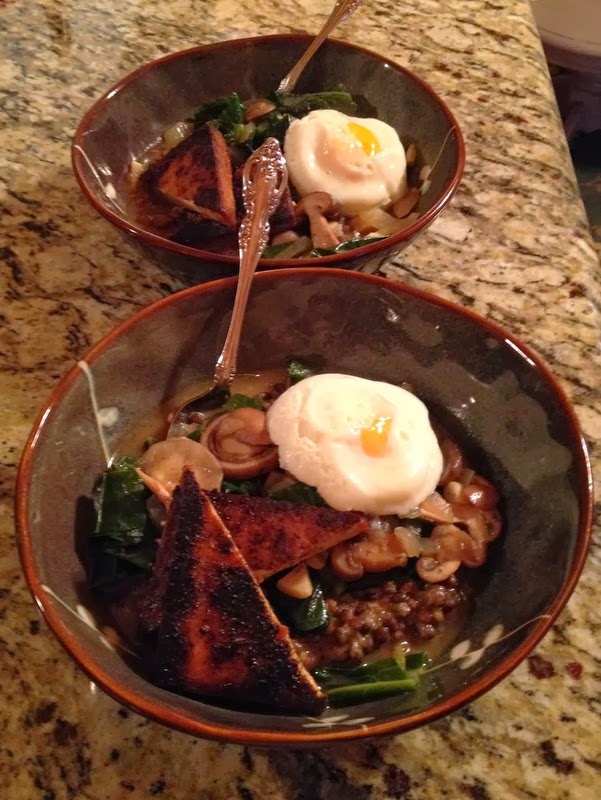
Creamy Lentils with Kale and Mixed Mushroom Ragout


Well happy New Year Folks!  We've been quite busy here and apologize for the lapse in posts, but we plan to be back in action from this point forward to accompany those healthy New Year Resolutions!  This dish is inspired by a recipe we saw in the Saturday/Sunday edition of the Wall Street Journal this past weekend by created by Chef Mark Steuer of the Carriage House in Chicago.  His original recipe called for grits, which of course we can't have since we're on the Low/No Carb kick here!  So naturally we tried to come up with a Low Carb alternative, and voila- we coin the new and tasty brilliance now known as "Creamy Lentils".  Kind of sounds weird at first, but it is absolutely amazing in this dish especially.  The kale gives a nice bitterness to the ragout which pairs exceptionally well with the creaminess of these lentils.  And hey, by the way, Ragout comes from the French term ragoĆ»ter, which means "to revive the taste" and typically refers to a main-dish stew.  Below you find our Low Carb spin on this fabulous dish.  We hope you enjoy it as much as we did!  It was the perfect meal for this past week's freezing nights.

Creamy lentils with kale and mushroom ragout
Dish Serves: 4
What you'll need:
  • 1 tbsp EVOO
  • 1/2 cup onion, diced
  • 3 cloves of garlic, minced
  • 1-1/2 lbs mixed mushrooms (we used a mix of shiitakes and baby bellas), cut into bite-sized pieces  
  • 1/2 cup whiskey (we used Jack Daniels)
  • 1 cup beef stock
  • 1/2 tbsp chopped thyme leaves
  • 2 tbsp butter
  • 1/2 a bunch of cabbage kale rough chopped (could also use normal kale or endive)
  • 3/4 pkg of Trader Joe's Steamed Lentils
  • 1-1/2 cups heavy cream
  • 4 eggs
  • 1 pkg of Trader Joe's Baked Tofu (approx. 8 oz. of tofu if using your own stuff)
  • 1/2 tbsp lemon juice
  • Salt and Pepper to taste
Directions:
  • The first step is to make your ragout.  Heat iil in a medium saute pan, stir in onion and garlic until softened.  After 2 minutes add the mushrooms and cook for an additional five minutes on medium heat.
  • Stir in whiskey and cook until evapoarated.  Next add your stock, thyme,1 tbsp butter, kale and a little salt.  Saute for another 5 minutes until the liquid has reduced by half.  Once the kale and mushrooms are tender, cover and remove from heat.  Keep the dish warm.
  • Meanwhile start your lentils.  Add lentils to medium sized pot and add the cream simmering over medium heat.  Add in a tablespoon of butter and season with salt, pepper, and lemon juice.  Let simmer on medium for 5 minutes then reduce heat to low/warm.
  • For extra protein, we decided to quickly saute baked tofu from Trader Joes in a pan.  We seasoned with salt & pepper and quickly tossed in a pan with a bit of olive oil.  The key here is to crisp up the tofu a bit and warm throughout- usually taking about 5 minutes total.
  • Meanwhile poach your eggs.  We use a microwave poacher but you can also do this in a pot.
  • The last step is to serve the dish.  First, distribute lentils in bottom of a bowl or deep plate.  Top each serving with the ragout, cut tofu into triangles and serve on top of ragout. Lastly, add the poached egg.  Enjoy! 

Sunday, October 20, 2013

Gruyere eggs on the go! Perfect protein for early mornings.

One of our readers asked for a breakfast post, so here you go!  This one is a favorite for me.  Especially when I know it is going to be a busy week.  I make time on Sunday to get my ingredients together and bake, and it really pays off during the week.  This week I am going out of town for work, so in an attempt to be an awesome girlfriend, I wanted to make Steven breakfast for the week.  For this baked egg dish, I used Gruyere cheese, which I am told is the 'cheese of Fall'. For those of you who don't know me, if something is festive, I go for it.

What you'll need:
6-8 large eggs
6-8 slices of Canadian bacon (I used turkey Canadian-like bacon this time)
Olive oil spray for the pan
Salt and pepper
1 cup of Gruyere cheese, grated
2 cups of leeks, sliced
2 tbsp of butter
3/4 of a medium sized yellow onion, diced
1.5 c dry, white wine

Directions:
Heat oven to 350 degrees F.
Heat medium sized saute pan with olive oil and throw in diced onions. Cook on medium heat, stirring occasionally until onions are browned.
Cut and wash leeks by cutting them once length wise and following by cutting across into small pieces.  Leeks are often hard to wash, so I tend to slice them and place them in a bowl with cold water for a few minutes before using.  Drain leeks.  Heat another medium sized pan with butter and toss in your leeks.  Brown for about 2 minutes and then add in white wine.  Continue to cook on medium high heat until liquid is reduced and leeks are soft.

Now for the fun part.  Grease your muffin pan and begin cutting your Canadian bacon slices four times.  You only need to cut a small slit on each side to help the bacon fit into the muffin pan easily.  Once you have cut all of your bacon and placed it into the bottom of the pan, spoon in about a tbsp of onion into each cup. You can now crack your eggs and place each one into its own cup, on top of the meat and onions.  Top each cup with the cheese and lastly add a few pieces of the cooked leeks on top.

Place into the oven for 18 minutes and viola! You now have an easy breakfast ready to go!

To reheat:  Place into microwave for approx. 1 minute.  I usually eat 1-2 cups depending on how hungry I am.

Thursday, October 10, 2013

Spaghetti squash alfredo with oven baked garlic shrimp

This recipe is one that goes to show that low-carb can be just as savory as a full-carb meal!  Once again, I decided to utilize my favorite carb substitute vegetable- the spaghetti squash.  I was inspired by a few Food Network videos that I have been watching where shrimp is baked instead of sauteed or boiled-  I'd never tried it so join me for my first time.  And by the way, it turned out delicious.  This is specially great for those of you who don't want to give up your love for Italian by going low carb.  Its really the best of both worlds- delicious and lower calorie.

What you'll need:
-A medium sized spaghetti squash
-Alfredo sauce (I cheated, instead of making my own I just bought a jar from Trader Joes)
-A pound of shrimp, peeled and devained (this was a good portion with leftovers for two people)
-5 cloves of Garlic, chopped
-1 pack of sliced mushrooms (I used baby Bella)
-Fresh basil to top off at the end
-Olive oil
-Salt & pepper to taste

Begin by preheating your oven to 375 degrees.  Wash and cut your spaghetti squash lengthwise, scoop out the seeds and loose pulp with a spoon.  Drizzle each half with a bit of olive oil and salt and pepper and place face down on a baking dish, adding a little bit of water to the dish to help steam the squash.  Place in the oven uncovered for about 45 minutes.  Squash will be ready when it easily scoops out into strands with a fork.  Be careful to not overcook the squash to prevent a 'mushy' texture.  Once the squash is cooked, scrape out the insides and place in a bowl, keep warm.

Crank the oven up to 400 degrees.  Toss the chopped garlic with the shrimp in a bowl, add the mushrooms and salt and pepper and drizzle olive oil over the shrimp, making sure everything is evenly coated.  Pour the contents of the bowl onto a baking sheet, spreading out evenly and place in the oven for 8 minutes. In the meantime, begin heating the alfredo sauce in a pot on the stove.

Once the shrimp is plump and cooked through, remove from the oven and toss into the warm bowl with the spaghetti squash.  Toss with serving tongs to evenly mix the squash with the shrimp and place into serving bowls.  Top with alfredo sauce and add chopped basil to garnish.

Bon appetit!

Wednesday, September 25, 2013

Produce box Wednesday


It's Wednesday!  And at our house, that means time for our weekly Produce Box delivery.One of the great things about living in Raleigh is that we can live in a downtown/city environment with great access to North Carolina farmers.  The Raleigh farmers market is one of my favorite Sunday activities- the smells, the colors, the people- it just makes me so happy to be a North Carolinian.

Sometimes, making the Sunday trip is a bit difficult, which is what makes the weekly Produce Box delivery so amazing.  Every Wednesday is like Christmas morning.  We leave an empty cooler with ice packs on our porch and come home to a box full of local goodness.  Sometimes we log on and select what we want that week, and other times we just enjoy the seasonal veggie surprise.  It also teaches us to break out of the box and try new recipes with produce we've never used or cooked with.  

Even if you don't live in Raleigh, there are community programs around the US committed to delivering local produce to homes.  Not only are we supporting our farmers and small businesses, but it simply tastes better.  You can taste the freshness in every box and feel like you are a part of the area in which you live and work.

The Produce Box is a weekly inspiration for me to cook and explore flavors.  Check out our local box at www.producebox.com

(And no, I did not get paid to write this entry...I just really love this Wednesday surprise)

Tuesday, September 24, 2013

Coffee + Chocolate= Simply the best salmon rub ever


Two of my favorite things in life are coffee and chocolate, so when I played around with this recipe it was clear that I would be using this one time and time again.  The rub could really go on a variety of meats, but I personally have only used it on salmon.  The chocolate and the coffee also are great flavors for the Fall season, so its a good one to save for any Fall dinner party.

What you'll need:
Coffee Cocoa rub
-1 tbsp of coffee grounds, finely ground (typically we have this left over in our coffee grinder, so its easy to use)
-1 tsp of chipotle powder
-1 tbsp of cocoa powder (unsweetened)
-1 tsp orange zest
-1/2 tsp cinnamon
-1/4 tsp salt
-1/2 tsp paprika


Mix all ingredients in a bowl with a blender or just a fork and set aside.

Rub salmon filet(s) with olive oil and follow with the rub, be sure to cover the entire top of the salmon.  Sear in a pan for 5 minutes per side or even set on the grill.  

Serving ideas:  We've paired this with a raw veggie salad and cilantro vinaigrette or even just roasted veggies (pictured here).


I can't stop bragging about this rub, it's so yummy and so simple.  Enjoy!

Thursday, August 29, 2013

Slow roasted cauliflower and red pepper

I'll be the first to admit I am not a huge fan of cauliflower.  I am not sure why, its just never been my favorite.  What am I a fan of?  Spicy food!  So when I first tried this combination, it became my favorite way to eat cauliflower.  The Summer heat has started to fade away in Raleigh and our days are filling with crisp, Fall air, so a spicy dish was just what I wanted.  Cauliflower is also a great low carb option to replace white foods like pastas, breads, and potatoes.  This recipe slow roasts the cauliflower in a variety of Southwestern spices and then finishes the dish with fresh lime juice and cilantro.  Oh, did I mention? There's also garlic.  This is a great dish to eat by itself or serve with grilled chicken or beef.

What you'll need:
-1 head of cauliflower
-5 tbsp of olive oil
-3 tbsp of minced garlic (I buy a jar of pre-minced garlic from the grocery store and keep it in my refrigerator for instant flavor at any given time)
-1 tbsp of Smoky Chipotle pepper
-1 tsp of crushed red pepper flakes
-1/2 tsp of cayenne pepper
-1 tbsp of cumin
-1/2 cup of chopped cilantro leaves
-Juice of 1 lime
-Salt

Instructions:
-Preheat oven to 325 degrees F.  Cut off the florets from the cauliflower head and separate them.  Drizzle olive oil into a baking dish and pour florets into dish.  Add in garlic, pepper, salt, and cumin and toss until mixed well.
-Place in oven for a little over an hour, you want to achieve a golden brown look.  Stir periodically.
-Once tender and slightly brown, remove from oven and squeeze lime juice over dish.  Toss in chopped cilantro, sprinkle with a bit of salt (to taste), and serve!


Feel good about yourself, fantastic health benefits of cauliflower:  
-Very nutritional, lots of vitamins
-Natural antioxidant and detoxifying agent
-Promotes cardiovascular and digestive health